Pitman Photography

Monday, June 18, 2012

Chore Chart

I am the type of person that likes my whole house to be clean at once. If I know I can't clean everything, I feel like I shouldn't even bother cleaning at all.   Now, my husband is the type of person that can live in a messy house for a few days and then one day wake up and become OCD about everything and clean all day long.  I figure, between the two of us, there has to be a healthy medium!

I got on Pinterest one day and searched for different cleaning chores and ideas. I came across several that I thought could work for us.  I didn't want to go out and buy anything so I decided to use whatever I had in my craft closet and the bulletin board we have in our kitchen.


I have to say, the first couple weeks of having this chart I woke up excited to see what my chore was for that day and to get it done!  With a little boy who naps 2 times a day for 45 minutes-2 hours (unfortunately it's usually the latter) I try to get my chores done during his first nap so I can have a little me time (or eat something!) during his next nap.  Rowan has always had this habit of waking up as soon as I sit down to eat.  Thankfully, I think he is outgrowing it.

I like the idea of a bulletin board because you can move chores around if you find they are not working for you on a certain day. It took me about a month to finally get the perfect schedule down for us.  At the start of R.'s morning nap, I take down my room card for the day and review the chores on the back. There is a great sense of accomplishment in pinning that chore back on the board.


Everyday - 
Make beds
Wipe down kitchen
Dishes
Tidy up and put away


Monday -
Kitchen: clean out fridge, wipe counters, sweep, mop
1st and 3rd: baseboards, windows

Tuesday - 
Living Room and Dining Room: dust, sweep, vacuum
1st and 3rd: mop, baseboards, windows, entry closet
Wash cloth diapers
Take out garbage

Wednesday -
Bathrooms (my very least favorite chore!): sinks, toilets, shower, baseboards, sweep and mop
1st and 3rd: wash rug

Thursday - 
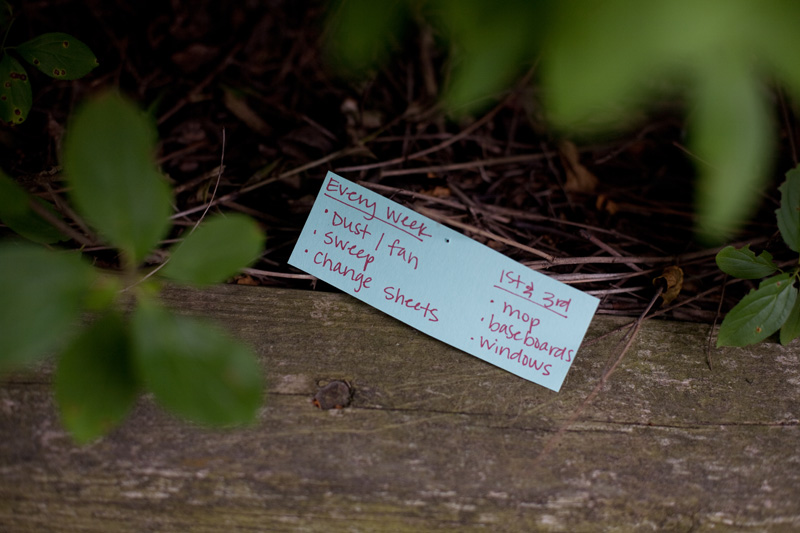
Bedrooms: Dust/fan, sweep, change sheets
1st and 3rd: mop, baseboards, windows
Wash cloth diapers
Laundry

Friday - 
Basement: wipe down, tidy up, vacuum
Guest Room if needed

Saturday - 
Family time!

Sunday - 
Family time!

Watch for a review of two Pinterest desserts later this week!



Thursday, May 31, 2012

It's a Tardis

When we met with the couple to see what they wanted for their wedding, a Tardis cake was mentioned for the groom’s cake.  I, not being a Dr. Who fan, thought they wanted a TORTUOUS cake and was a little surprised.  After much confusion and talking with Claire, I finally realized we would not be making a turtle. Although, that might have been a bit easier.  :)

This beautiful Tardis cake that Claire spent so much time painting and getting perfect, was for our first wedding post-babies.  Cutting out all the panels and such was suprisingly easy. The inside is Styrofoam but the outside is all edible.  Not that you’d want to eat all that gumpaste, unless you’re my husband of course.


Wednesday, May 30, 2012

iSpy With My Little Eye...

...a super fun Pinterest craft!

The minute I saw this, I knew I wanted to make it for my nephew Iain for his birthday.  They travel to Canada often and I thought this would be so fun to bring along on car trips.  I followed the directions to a T from Make it and Love it.  The only thing different is I used clear beads instead of poly fill as they did not sell that at JoAnn's.


Some of the fun trinkets inside?

  • alphabet beads
  • sports beads - soccer, football, baseball
  • stickers
  • googley eyes
  • buttons

Thursday, May 24, 2012

A Gentleman's Cake

Claire and I are making cakes again!   We have done a birthday party, a baby dedication and a wedding.  This is a cake we did back in February.  It was for a "gentleman's theme" birthday party.
My favorite part?  All the different mustaches.


The super awesome wedding cake is coming soon!


Tuesday, May 15, 2012

DIY: Toddler Birthday Gift

I've always preferred to make homemade gifts.  So with three nephews, a niece, and an almost five year old sister, I've had lots of practice!

These blocks are my favorite and I am so excited to make some for our son when he is old enough to enjoy them.


Baby Wooden Blocks

Tools needed:

  • Any size blocks
  • Decorative paper
  • Sand paper
  • Sponge brush
  • Mod Podge - safe for babies
  • Extras: letter, numbers, stickers
How to:

Lightly sand each block. Trace one side of the block six times onto the blank side of the decorative paper. Cut out.  Glue the paper onto each side of the block with a light coat of Mod Podge. Once dry, paste the letters, numbers, or stickers with the same technique. Coat the block with 3-4 four layers of Mod Podge, make sure to leave time to dry between each layer.  Don't worry, it will dry clear!  I used my Cricut to cut out the letters, but you could use scrapbook letters too.

Playdough


The thing I like about this playdough is you will probably have all the ingredients in your kitchen. It's great for a last minute gift!


Playdough

Ingredients needed:
  • 2 cups flour
  • 2 cups warm water
  • 1 cup salt
  • 2 TBSP vegetable oil
  • 1 TBSP cream of tarter
How to:

Mix all the ingredients together and stir over low heat.  When the dough has pulled away from the sides and starts to clump together in the center of the pan, it is finished.  Remove from heat and let it cool.  If it's still sticky, cook it for a little bit longer.  Knead the dough on a Silpat until smooth. Divide into sections and add color. I just used plain old food coloring.

Gift Bags


To make these fun bags all you need is:

  • Iron on fabric letters
  • Felt
  • Embroidery floss & needle
  • Any fabric bags
How to:

Iron the letters to the felt and cut the size you need.  Use the embroidery floss to sew the felt onto the bag.

I hope these give you a few ideas to use for your next toddler gift!


Monday, May 14, 2012

Hello Again!

Well, after quite the long sabbatical, (has it really been over 8 months since my last post?!) I think it's about time I start blogging again.  I want to make a few changes, but overall, the purpose of this blog will remain the same: To share the things I make and love with you.

I knew it would be hard to find the time to craft and bake with a newborn, so I decided to take a little break and see what motherhood was all about. :)

Our beautiful Rowan Eliot was born on September 7, 2011.


I cannot believe he is 8 months already. So many people told me to treasure each and everyday as the time will go by too fast.  I'm so glad I took this advice to heart, because it is so true.  It's crazy how much I love this little guy.


Now that we are in somewhat of a good routine, I feel like I can add blogging back in.  Here are some of the things I hope to add:

  • A Pinterest Day - once a week is the goal, but at least once a month.  I have tried so many recipes, crafts, hairstyles, etc that I have found on Pinterest (follow me here!) that I would love to record here for you all. Even the failures - which I've had!
  • A "Rowan Day" where you can all see pictures of my cute son and read about the fun things he is doing. 
  • A "Get Organized Day" where I will share with you what has worked (and not worked!) for our little family of three.

I just have to say, I am so excited to get back to blogging! :)


Monday, September 5, 2011

Nursery on a Budget

We put quite a bit of planning into this little boy's room. We knew we wanted it to be a room that he could grow up with and one we wouldn't have to change every couple years. We're both so happy with how it turned out.

Here are some of the things we did ourselves or found for a great price:

My husband, a photographer, has several old film cameras and decided to take three and spray paint them to fit in the nursery. They turned out awesome and look great in his room.


These leaves above the crib were a steal from Urban Outfitters.  We only needed two boxes to make the design. We thought they would be a dark grey color, but it turns out they were way too brown.  So we grabbed our trusty spray paint and painted them all!


I got up the courage to make the crib skirt. I thought it would be a lot harder then it was and was so so happy it wasn't!  I measured the crib on the long side and one short side (no need for a skirt in the back or on the side against the wall!) and measured the fabric from there. The grey fabric I found at JoAnn's on sale and the leaf border fabric I bought about 4 years ago at Ikea. The fabric has velcro on it that attaches to the spring underneath the mattress. This way it can be moved up as the mattress gets moved down.


We found these super cool ornaments at a Crate and Barrel Outlet in Chicago. They were $3 and $4 a piece!


These super cute prints were a great Etsy find!  Check out his store, he has so many fun ones.  The little clothespins holding up the prints we found at Paper Source and of course, spray painted them!


The hot air balloon print can be found here.


The US and Canada prints can be found here.


And the scrabble letter here.

The window seat and pillows were easy to make. I just recovered the window seat that was already there with fabric we got at Ikea. The white fabric used are old curtains we had laying around!


My friend Kristi and I made these prints on her Cricut. They were easy, fun, and oh so cute!


This changing table I actually haggled for a great deal - $40! It's in perfect condition and the right color.  All I did was mod podge scrapbook paper on both shelves and we were good to go. The grey baskets were a STEAL at a Land of Nod outlet for $4 a piece!!


And last but not least, another window seat!  I bought four foam cushions at Hobby Lobby ($5 each) and covered them with the fabric I originally bought at JoAnn's to make curtains. (We decided to go with black out ones instead.)


We can't wait to get this little boy in his room!